출처 : https://www.learnopencv.com/filling-holes-in-an-image-using-opencv-python-c
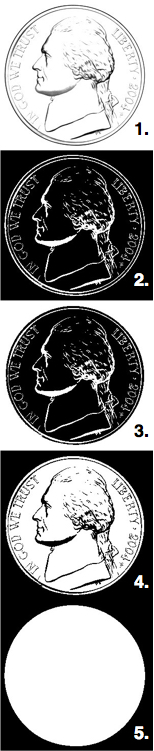
1 2 3 4 5 6 7 8 9 10 11 12 13 14 15 16 17 18 19 20 21 22 23 24 25 26 27 28 29 30 31 32 33 34 35 | #include "opencv2/opencv.hpp"using namespace cv;int main(int argc, char **argv){ // Read image Mat im_in = imread("nickel.jpg", IMREAD_GRAYSCALE); // Threshold. // Set values equal to or above 220 to 0. // Set values below 220 to 255. Mat im_th; threshold(im_in, im_th, 220, 255, THRESH_BINARY_INV); // Floodfill from point (0, 0) Mat im_floodfill = im_th.clone(); floodFill(im_floodfill, cv::Point(0,0), Scalar(255)); // Invert floodfilled image Mat im_floodfill_inv; bitwise_not(im_floodfill, im_floodfill_inv); // Combine the two images to get the foreground. Mat im_out = (im_th | im_floodfill_inv); // Display images imshow("Thresholded Image", im_th); imshow("Floodfilled Image", im_floodfill); imshow("Inverted Floodfilled Image", im_floodfill_inv); imshow("Foreground", im_out); waitKey(0); } |
'영상처리' 카테고리의 다른 글
| normalize, equalizeHist, threshold, adaptiveThreshold (0) | 2018.11.10 |
|---|
